
User Guide
Admin Console
In the Remotto Admin Console, you can manage devices, group settings, print controls, web browsing restrictions, and app restrictions from a single interface.
Dashboard
After logging in, the dashboard shows the overall system status at a glance so you can quickly assess the current state of the environment.
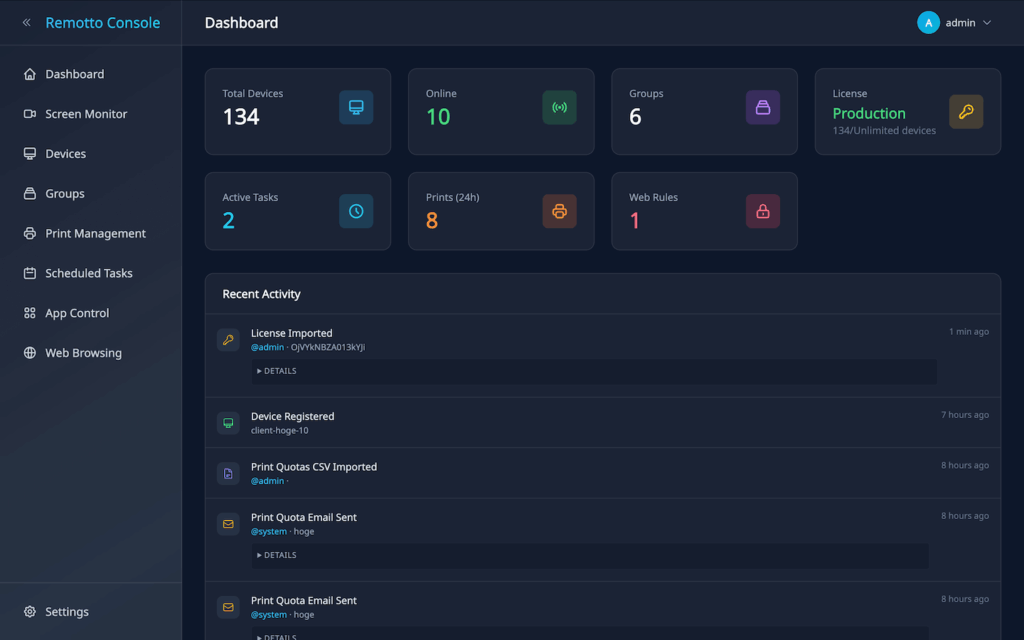
- Total Devices — Number of devices currently registered
- Online — Number of devices currently online
- Groups — Number of groups created
- License — Current plan and total number of devices allowed
- Active Tasks — Number of scheduled tasks currently in effect
- Prints (24 hours) — Number of pages printed in the last 24 hours
- Web Rules — Number of configured web access restriction rules
- Recent Activity — History of administrative actions
Screen Monitor
The web browser allows you to monitor the live screens of online devices in real time.
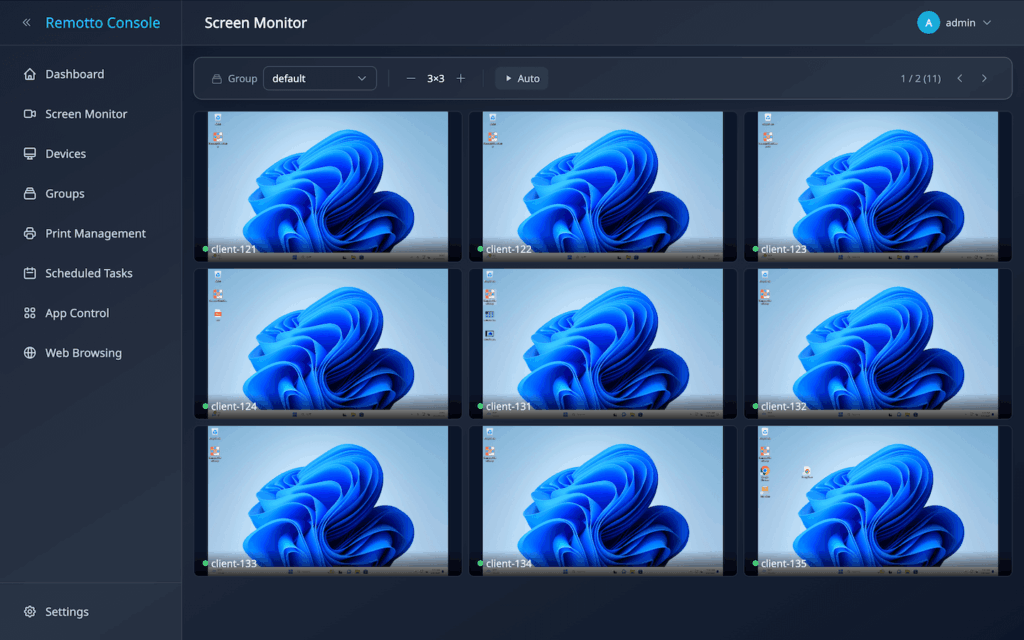
- Group Selection — Switch between groups to display.
- Change Grid Size — Adjust the display size from 1×1 to 5×5 using the
−and+buttons. - Page Navigation — If there are more devices than can fit in the grid, they are automatically split across pages. Use the
◀and▶buttons to switch pages. - Auto Scroll — When
▶ Autois enabled, the display automatically advances to the next page every 10 seconds.
Device Management
You can manage the status, information, and operations of registered devices.
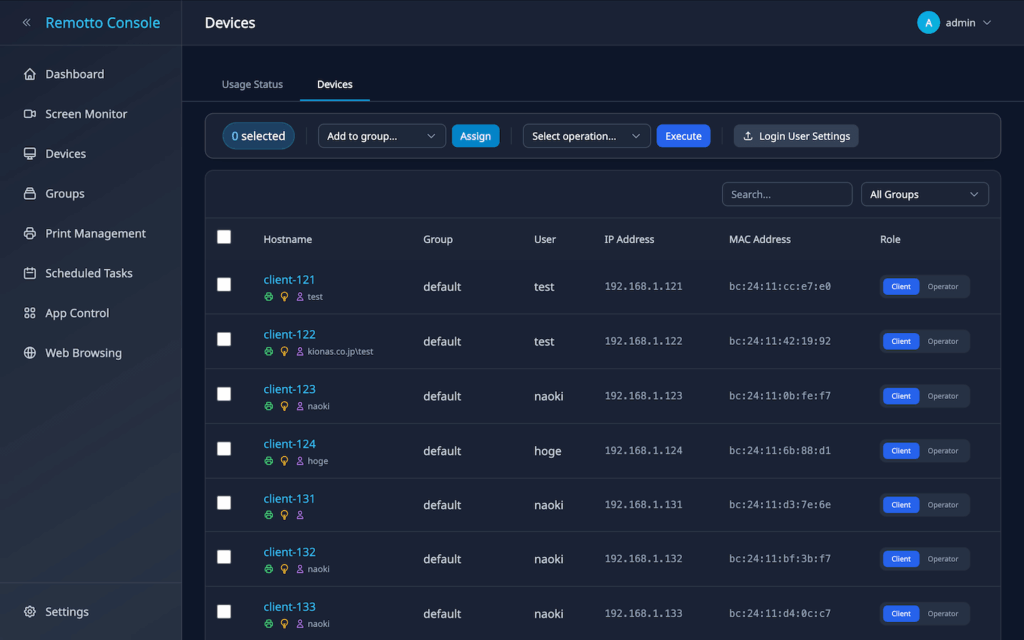
- Search and Filters — Search by hostname, username, IP address, and other criteria
- Device Details — Click a hostname to view hardware information such as CPU, memory, and storage
- Bulk Actions — Perform actions on multiple devices at once
- Role Settings — Set devices as either clients or operators
- Client — A regular user device that is monitored and displayed to an operator
- Operator — A device running Remotto Viewer, used to control and view client devices
Bulk Actions
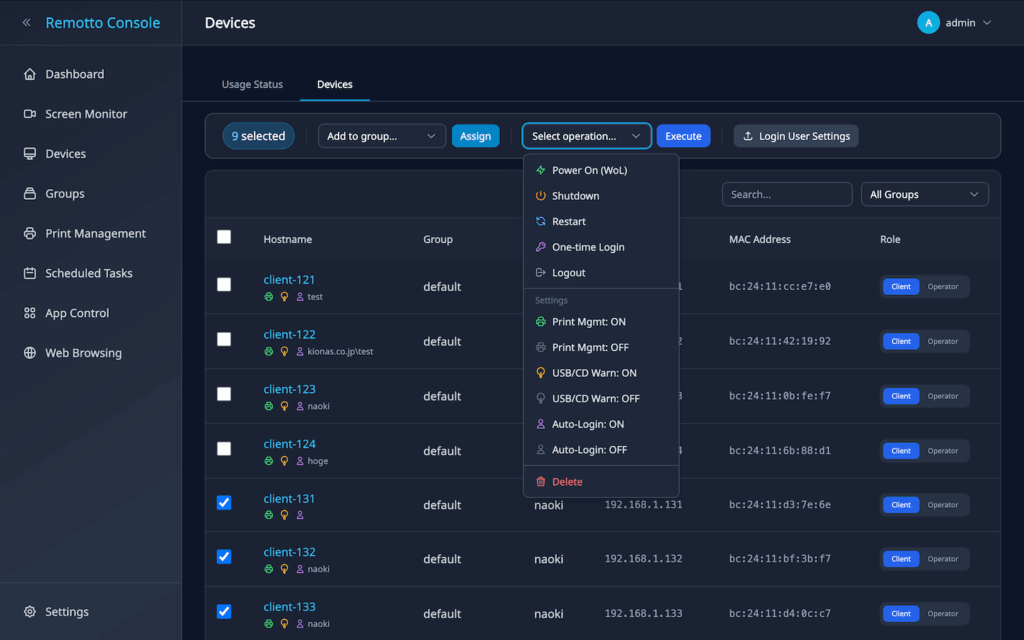
- One-Time Login — Logs in once with the specified account
- Auto Login — Logs in automatically on subsequent sessions
To Use Power On (Wake-on-LAN)
・Wake-on-LAN must be enabled in the BIOS/UEFI settings
・The network adapter must be configured to allow Wake on LAN via magic packet
・The target device must be connected via wired LAN
・If the target device is on a different subnet from the server, at least one Remotto client on the same subnet as the target device must be running to relay the signal
Login User Settings
When using one-time login or auto login, you must register login user information.
Login user registration can be processed in bulk using a CSV file.
- Download the CSV template from the “Devices” screen in the Admin Console.
- Edit the
usernameandpasswordcolumns in the downloaded CSV file. - Upload the edited CSV file and import it.
| Column Name | Description | Example |
|---|---|---|
hostname | Device hostname | pc-001 |
mac_address | Device MAC address (: or - separated) | 00:1A:2B:3C:4D:5E |
username | Login username | user01domainuser01user01@remotto.local |
password | Login password | passw@rd |
Group Management
You can manage devices by group and apply delivery quality and restriction settings collectively.
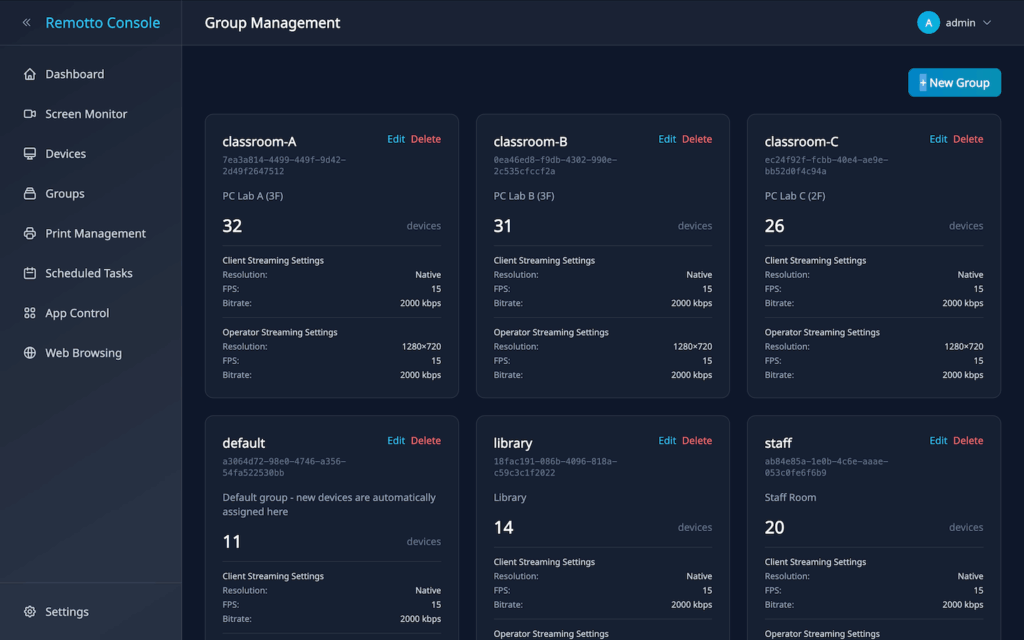
端末をグループ単位で管理し、配信品質や制限設定をまとめて適用できます。
- Group Creation — Create a group by entering a name and description
- Group Editing — Change the name, description, and delivery quality
- Group Deletion — Delete groups that are no longer needed
Streaming Delivery Settings
You can configure streaming quality for both client devices and operator devices on a per-group basis.
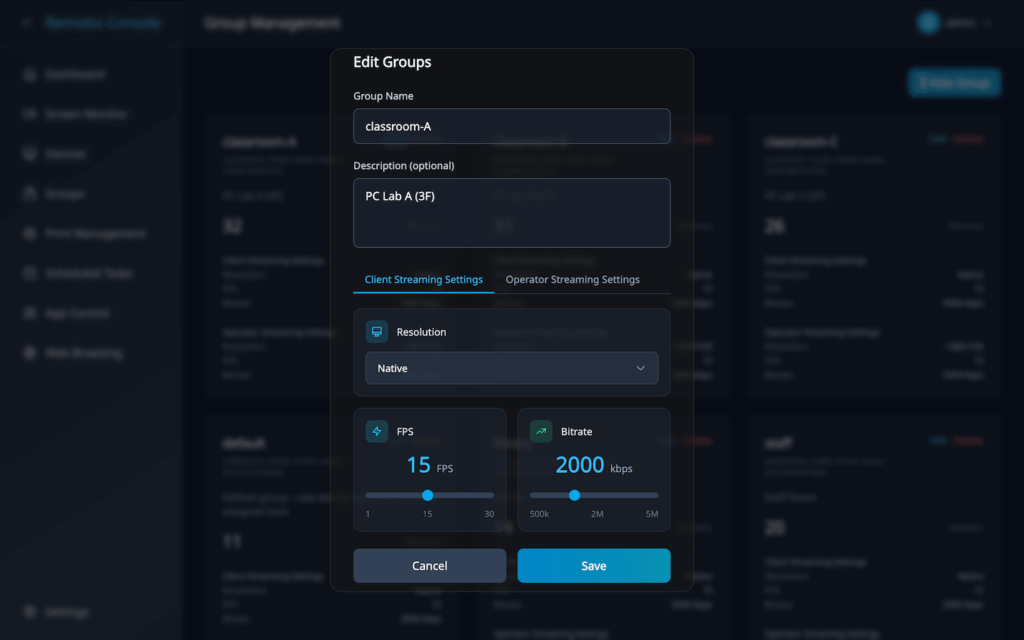
| Resolution | native / 1920×1080 / 1280×720 / 854×480 / 640×360 | This sets the resolution of the streamed video. Selecting native matches the device’s desktop resolution, but it may increase bandwidth usage. |
| FPS | 1〜30 fps | This is the number of frames per second. Lowering the value reduces bandwidth usage. |
| Bitrate | 500〜5000 kbps | This is the maximum video bitrate. Increasing the value improves image quality but also increases bandwidth usage. |
Print Management
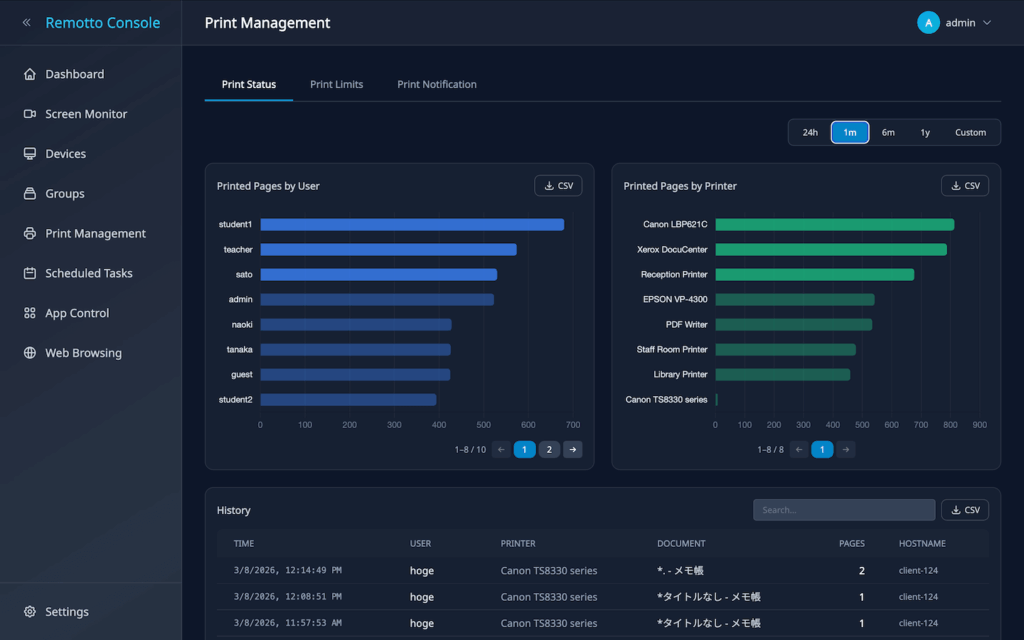
You can track the number of printed pages per user and set print limits.
- Print Limit per User — Total maximum number of pages each user can print
- Per-Job Print Limit — Set a maximum number of pages per print job to prevent excessive printing
- Print Logs — Record when, by whom, what was printed, and how many pages were printed (including document name and printer name)
- Default Print Limit — The default page limit applied to new users during LDAP/AD synchronization (0 = unlimited)
- CSV Export — Export print history as CSV
- Block Notifications — When printing is blocked, a balloon notification is shown on the client device explaining the reason (page limit exceeded / job limit exceeded)
Printed page counts are calculated based on the number of pages sent by the application. For example, even if a 10-page document is printed double-sided, it is counted as 10 printed pages.
Email Notification Templates
You can send notifications to registered email addresses when printing is approaching its limit or has reached the limit.
| Type | Send Timing |
|---|---|
| Warning Email | When usage reaches the configured threshold (default: 80%) |
| Limit Reached Email | When usage reaches the limit and printing is restricted |
The following placeholders can be used in the email body:
| Placeholder | Description | Example |
|---|---|---|
{username} | Target user name | user01 |
{used_pages} | Number of pages already used | 85 |
{limit_pages} | Configured page limit | 100 |
{remaining_pages} | Remaining printable pages | 15 |
By embedding these placeholders in the body, user-specific information is automatically reflected.
Subject: 【Printing limit is approaching】

Body:
{username}

Your printing allowance is nearly exhausted.

Used: {used_pages} pages
Limit: {limit_pages} pages
Remaining: {remaining_pages} pages
Printing will be blocked once the limit is reached.
If you have any questions, please contact the administrator.
Print Limit Settings
You can register and update print limits for each user in bulk using a CSV file.
- Download the CSV template from the “Print Management” → “Users” tab in the Admin Console. The current list of registered print limits is exported.
- Edit the columns in the CSV file. You can add new users, change limits, and set email addresses.
- Upload the edited CSV file to preview the content.
- After reviewing the content, execute the import.
| Column Name | Description | Required |
|---|---|---|
username | Login username | Yes |
mail_address | Email address for notifications | Yes, unless delete is used |
used_pages | Current number of pages used (reference only; ignored during import) | No |
limit_pages | Maximum number of pages allowed | Yes, unless delete is used |
operation | Operation type (see below). If omitted, the default is update | No |
| Operation Value | Behavior |
|---|---|
update | Default behavior. Creates a new user or updates the email address and limit for an existing user |
delete | Deletes the print limit setting for the specified user |
reset | Resets the used page count to 0 for the specified user without changing the limit |
Scheduled Tasks
You can automate device operations by creating daily, weekly, or one-time recurring tasks.
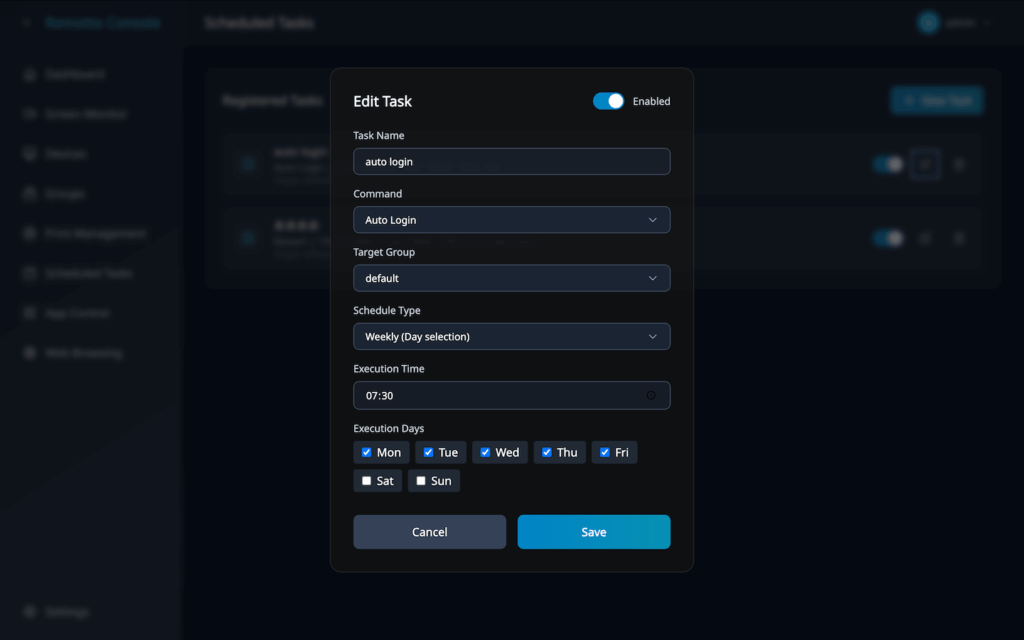
- Open the “Scheduled Tasks” screen in the Admin Console.
- Select “Create New”.
- Enter a task name.
- Choose the action to perform:
- Wake-on-LAN
- Shutdown
- Restart
- Auto Login
- Select the target group.
- Choose the execution frequency:
- Daily: Run at a specified time each day
- Weekly: Run on selected days and times; multiple days can be selected
- One-time: Run on a specified date and time; past dates cannot be selected
- Set the execution date and time.
- Review the settings and save the task.
App Management
You can review application usage logs on devices and restrict app launches by group. Applications added to the block list are automatically blocked when launched.
- Open “App Restrictions” from the sidebar in the Admin Console.
- Select the target group.
- Enter the process names of the apps you want to block, one per line.
- Enable the setting and save it.
You can review the usage history of applications launched on devices.
- App Name — Displays the process name and display name of the launched application
- Device and User — Shows which device and user launched the application
- Time Filters — Filter by 24 hours, 1 month, 6 months, 1 year, or a custom range
- Search — Search by app name, username, or device name
- CSV Export — Export app usage history in CSV format
Web Access Management
You can review web access logs and configure browsing restrictions. Logs are recorded only when the local proxy on the client device is enabled.
You can review access history and filter or export it as needed.
- Destination — Displays the URL and domain name
- Device and User — Shows which device and user accessed the site
- Date and Time — Records the access timestamp
- Time Filters — Filter by 24 hours, 1 month, 6 months, 1 year, or a custom range
- Search — Search by URL, username, or device name
- CSV Export — Export access logs in CSV format
Filter Mode
- Block List — Blocks access to specified domains and allows all others
- Allow List — Allows access only to specified domains and blocks all others
Specifying Domains
- Exact Match — Matches only the specified domain, such as example.com (subdomains are excluded)
- Wildcard — Use *.example.com to match domains such as example.com and sub.example.com together
Setup Procedure
- Select the target group from “Group Management” in the Admin Console.
- Choose the filter mode (Block List / Allow List).
- Enter the target domains one per line.
- Enable the setting and save it.
The setting is applied to client devices on their next sync cycle, which typically takes a few seconds to a few tens of seconds
Because the Remotto client processes HTTPS traffic through a local proxy, certificate validation may fail when using the Microsoft Store source (msstore) with winget.
When installing software with winget, use the --source winget option.
winget install <package-name> --source wingetSettings
You can manage licenses, user accounts, LDAP/Active Directory integration, and email settings.
Register a license key to expand the number of usable devices and available features.
- Free plan: Without a registered license, up to 5 devices can be used, and only basic features are available.
- License registration: Import the license key from the settings screen and activate it.
License Key Registration Procedure
- Click “Settings” in the sidebar.
- Select the “License” tab.
- Upload the license key file using the “Choose File” button.
- Click the “Import” button.
- After registration is complete, license information such as plan, device limit, and expiration date is displayed.
User Management
Create and manage user accounts that can log in to the Admin Console.
- Local accounts: Create accounts using a username and password.
- LDAP accounts: When LDAP integration is enabled, users authenticated by LDAP are automatically registered on first login.
Account Creation Procedure
- Click “Settings” in the sidebar.
- Select the “Users” tab.
- Click the “Add User” button in the upper-right corner.
- Enter the following in the dialog:
- Username: User ID used for login
- Password: Initial password
- Click “Create” to complete the process.
LDAP / Active Directory Integration
Connect to an external directory service to allow users to log in to the Admin Console with their existing accounts.
- Connection settings: Specify the LDAP server host, port, and base DN.
- SSL support: Supports encrypted communication via LDAPS (port 636).
- Enable / Disable: Can be toggled with a switch.
Email Notification Settings
Configure SMTP settings and the sender email address used for notifications such as print limit alerts.
- SMTP server: Set the host, port, authentication username, and password.
- Encryption: Supports SSL / TLS (STARTTLS).
- Sender: Set the sender name and sender email address.
Remotto Viewer
Remotto Viewer is a desktop application for operators, provided separately from the Admin Console. It lists client device screens, allowing remote operation, screen sharing, and file distribution.
Display Mode and Operation Mode
Displays multiple device screens as thumbnails.
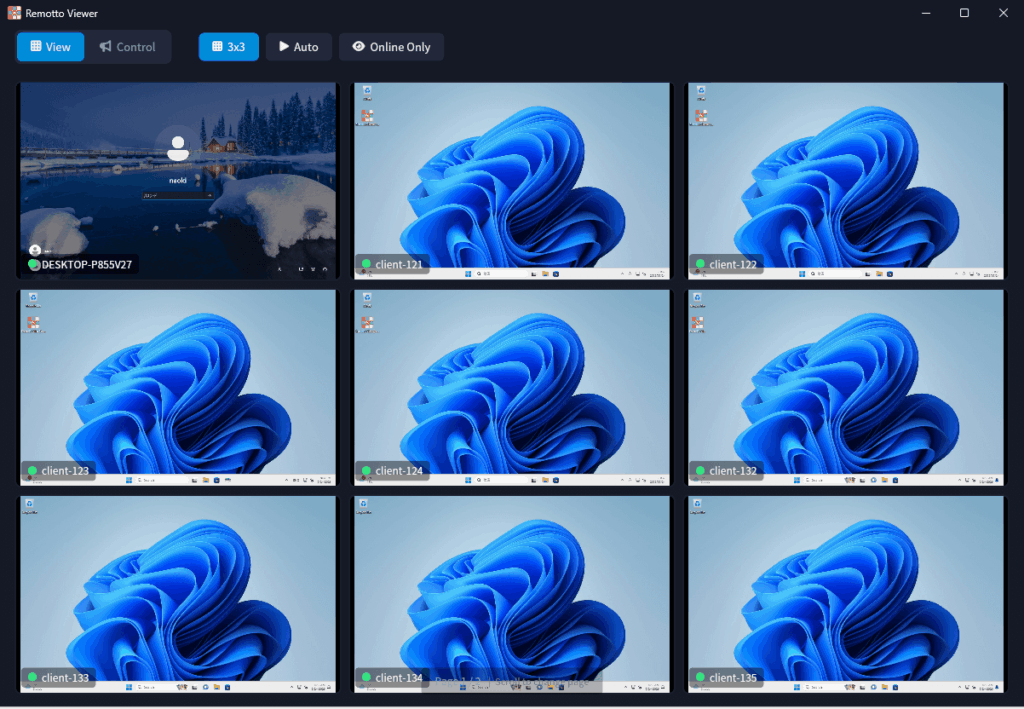
- Grid View — Can be switched between 1×1, 2×2, 3×3, 4×4, and 5×5
- Auto Page Advance — Devices that do not fit in the grid are automatically paginated
Double-clicking a thumbnail allows you to control the target device.
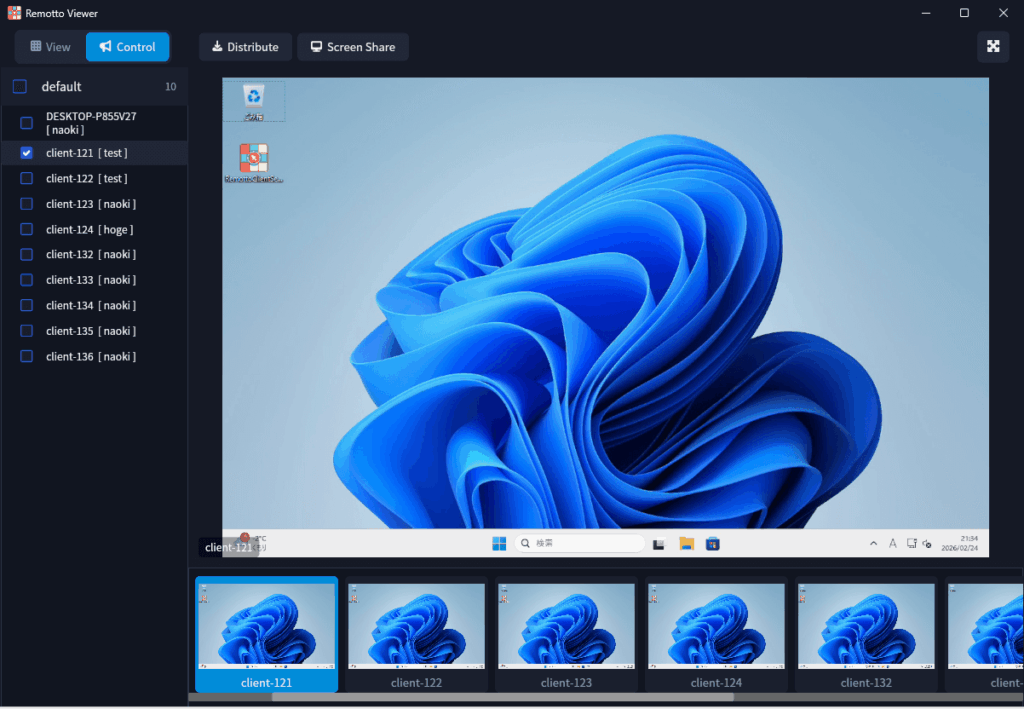
- Mouse Control — Clicks, drag actions, and scrolling are transmitted directly
- Keyboard Input — Keystrokes are transmitted in real time
Screen Sharing
You can broadcast the operator’s screen to client devices.
- Click the “Screen Sharing” button in the Remotto Viewer toolbar.
- Select the target to share:
- Desktop — Share the entire screen
- Window — Share a specific window only
- Custom Area — Drag to select any area of the screen to share
- After selection, the content is displayed in real time on client devices in the same group
- To stop screen sharing, click the Screen Sharing button again
File Distribution
You can distribute files or folders to selected client devices.
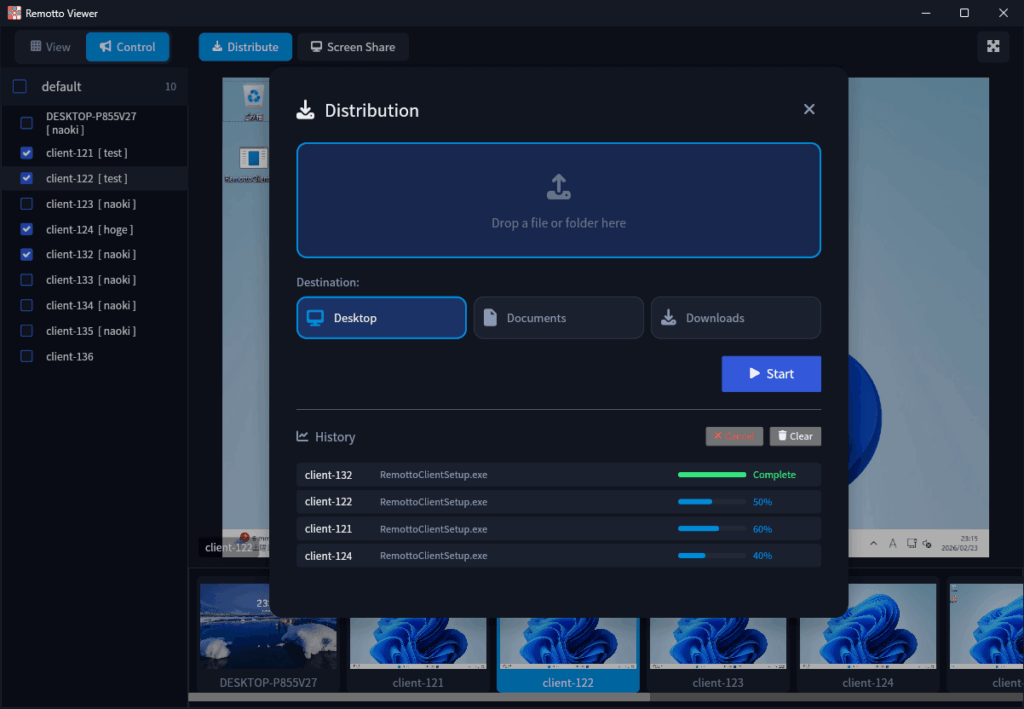
- Click the “File Distribution” button in the Viewer toolbar
- Select the file or folder to distribute
- Choose the destination:
- Desktop
- Documents
- Downloads
- Click “Start Distribution” to begin; the progress bar shows the transfer status in real time